


I wanted to wrap up this tutorial series with one last ornament, and I think I saved the best for last, a darling little snow bird. For this ornament we will combine techniques from two previous tutorials, the top portion of the Christmas Dangle and the fringe portion of the Garland, to make one last ornament or package topper.

There is such variety in using my simple paper punch technique and I am seeing some really great results. My sweet friend Karen (My Desert Cottage) came over and learned from the technique and you have to see her spin off tutorial, it is fantastic! To visit Karen's free tutorial post click HERE.

Have you made any of the items in this series? Want to be featured here? Send me an email with a photo of your project and if you have one a link to your blog and I will post your pretties here with a link back to you!
Now, let's get started on our pretty paper birds...
MATERIALS:
* White Gift Tissue Paper - I used two .99 cent packages with 10 20" x 20" sheets purchased at Hobby Lobby
* Sewing Machine, thread and bobbin to match tissue paper
* Scissor
* Paper Scraps - Make sure the paper you use has some weight to it, I tried some book pages but the paper was too flimsy. I used some small left over pieces of vintage sheet music. If you use vintage paper make sure it is not brittle.
* Paper Punch - Fiskars Large Squeeze Scalloped Oval Punch
OR
Cut out ovals in provided pattern size
* Glues - Aleene's Tacky Glue, Hot Glue, Elmer's School Glue, Glue Stick
* 6 Pearl beads per bird
* White florist wire and wire cutter
* Bird's Head Pattern - Provided below

BIRD BODY:
* Using craft punch, punch out 6 paper shapes, or cut out ovals in size of the provided pattern

* Stack them together, sew down the middle of the stack making sure to back stitch to lock thread ends, trim off excess thread ends, separate folded layers


* Starting with one seam side of your punch ornament place a very small dot of tacky glue on ends as shown below, making sure to leave middle of punch flaps unglued, press into place. Flip over and do other seamed side. Repeat with remaining flaps, you should end up with six sections when you are done, allow to dry


* Print out provided bird's head pattern, trace onto paper or card stock with the notched end on the paper fold as shown below, cut out, open up and use a glue stick to secure both sides of the head together


* Slide notch of bird's head onto body along the sewn seam line, using tacky glue, dot both sides of the notch and secure top and bottom of head, allow to dry


* Use a tweezer to open up center section of glued flaps, add a dab of tacky glue and glue bead of your choice into the center of the flap, repeat with remaining 5 sections and allow to dry

* Brush each section between beaded flaps and both sides of bird's head with Elmer's glue and sprinkle with glitter, shake off excess, allow to dry
BIRDS TAIL:
* Layer 10 sheets of tissue paper, cut into 2 inch strips, you will need 15 of the 2 inch 10 layers strips for a 100 light garland strand. It is easier to cut if paper is stacked and folded as shown below:

* Unfold layered paper strip and sew directly down the middle of the tissue strip as shown below, clip off end threads:


* Crease and fold strip along sewing line

* Snip through layers being careful not to clip through the stitching, just clip up to about 1/8 of an inch away from the stitching.
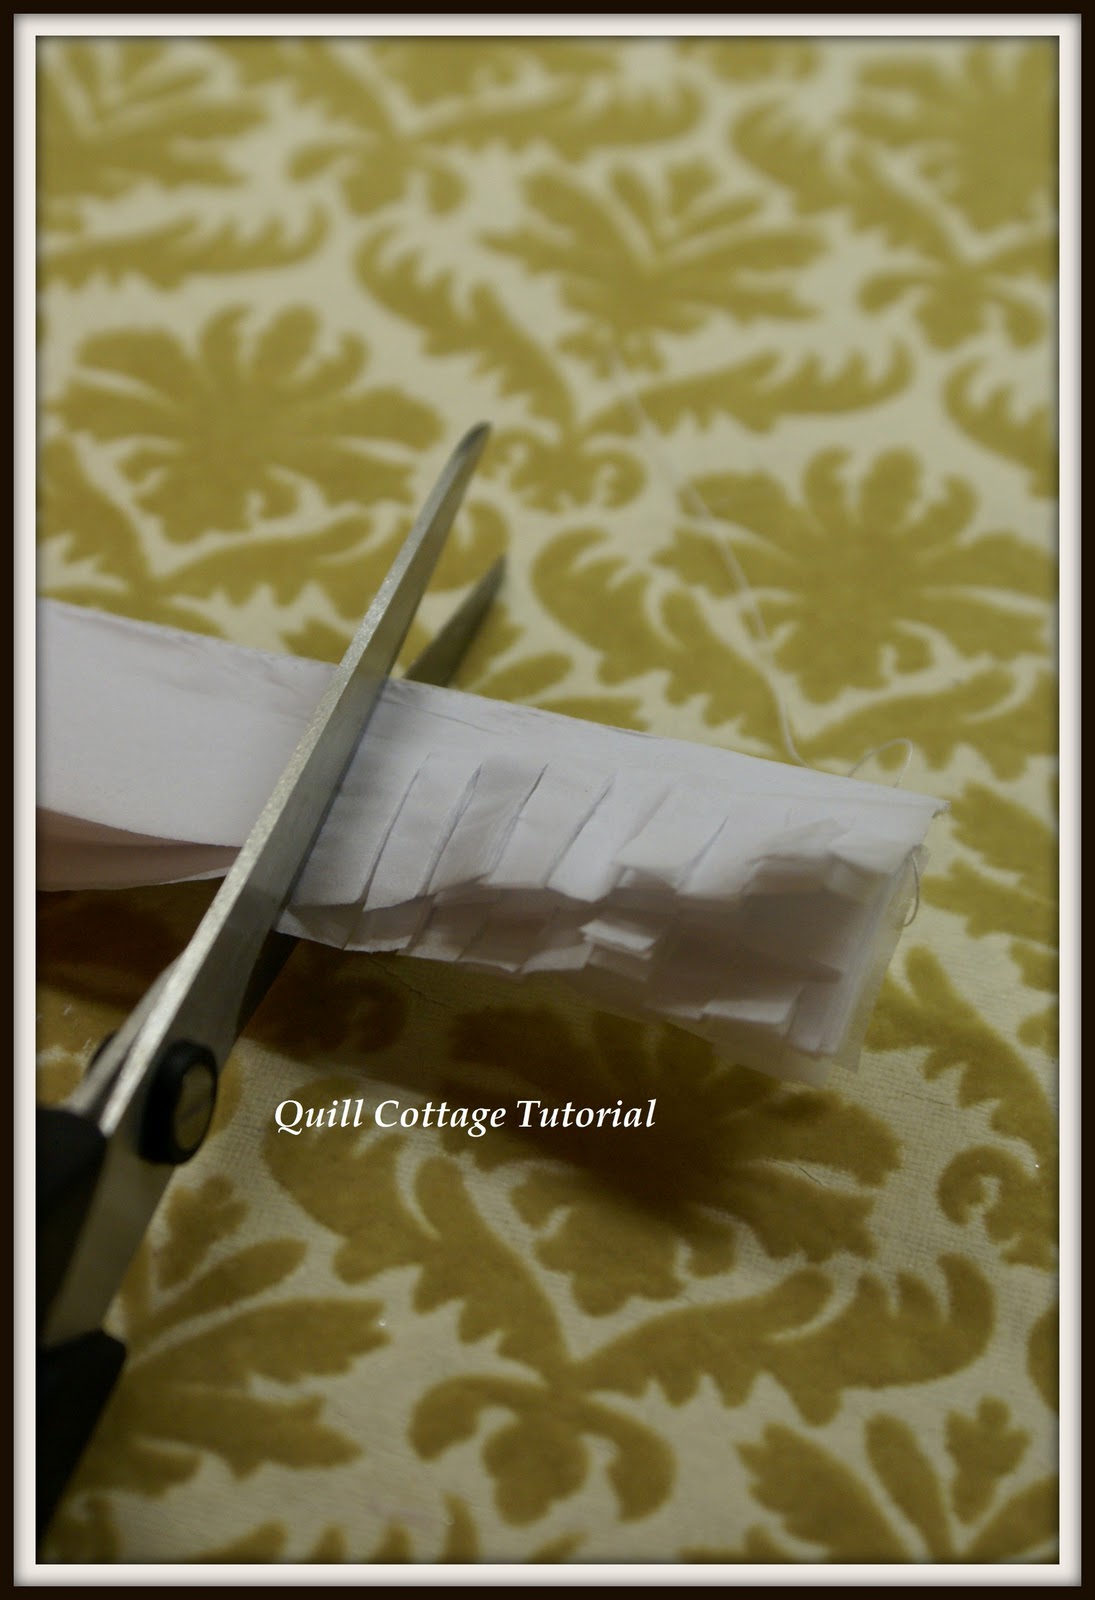
* Unfold, hold end of fringe strip between your palms and roll it back and forth like you are rolling play dough, move down the strip until all the fringe fluffs out, repeat with remaining strips


* Using wire cutter, clip off a 4 inch section of wrapped florist wire, snip off a three inch section of the tail fringe and glue to wire, place glue onto remaining 1 inch of wire and slide between bottom seam to glue in place, allow to dry


* Curl birds tail by bending upwards and then about 1 inch from the end end away from the body

* If you want your bird to hand either use a mini hole punch just behind the head to insert a ribbon or string or you can do what I did and just let them sit on the tips of your tree branches
Please feel free to save or print out this tutorial for personal use only.
I hope that you have enjoyed this little mini tutorial series and also I hope you will join me again on Monday when I put the sign up for my annual holiday give away! Now, it is back the Christmas Tree Tag farm for me...gotta get these things finished and in the mail!


9 comments:
Gosh, too much work for me, but it sure is gorgeous!!
stunning!
tot
So, I heard from my sister and she said, "I'd like to do some crafting with you when I'm home." Looks as if this will be on our list. =) Thanks so much, Miss Sandy, for all your generosity. I'll be linking back; you can count on it.
Such a sweet little cute bird- so lovely Sandy.
Beautiful in every way- you are such a clever artist, and your creations are fabolous .
Thankyou again for a wonderful tutorial, dear.
Hugs,and happy week-end.
Dorthe
These too are awesome Miss Sandy!! Thank you so much for linking to my ornament tutorial! I couldn't have done it without you!! Big Hug!!
Karen
Ah, Sandy, this has already made it to Pinterest by someone! ;-)
BEAUTIFUL, my friend!
Hugs, Diane
As usual, you come up with something stunning! Wonderful dear and Thank you for the superb tutorial! :)
Hugs,
Thank you so much for sharing how to create all your lovely ornaments. May you and your family have a blessed Christmas.
Hugs Alveen
These are so cute. I adore each of them.
Post a Comment